Grant Skinner

The "g" in gskinner. Also the "skinner".

@gskinner

Prep For Zoe JSFL Command

We’re recently been working on some pretty cool CreateJS projects with heavy dependencies on sprite sheet animations. Our sprite sheet export tool, Zoë, does a pretty good job, but it’s limited to exporting the main timeline of a published SWF. To facilitate an efficient designer/developer workflow, we really needed a solution that would let us maintain a single FLA, containing multiple animated symbols, and export them to a single combined spritesheet.

We considered using the new export to spritesheet feature in CS6, but it was missing some features we needed. Zoë offers multi-image sprite sheets (important when exporting smaller sprite sheets for mobile compatibility), configurable smart frame reuse, and flexible registration point export for EaselJS. It’s also open source, so we could modify it to work the way we needed.

To facilitate this workflow, I wound up writing a (fairly) simple JSFL command called “Prep for Zoe”. It takes multiple symbols, copies them as Graphic instances, distributes them to the main timeline, and copies their labels appropriately. If no label is specified on the first frame of a symbol (or it is a bitmap), it will automatically add a label based on the symbol’s name. It will even warn you about duplicate labels. Finally, it publishes your FLA to generate an updated SWF.

The end result is a single SWF with all the animations and labels on the main timeline, which you can bring it into Zoë to export them all as a spritesheet.

To use it, you just place all of the symbols you want to include in a single guided layer on your stage then run the command. Your main timeline will be prepped for you, and the SWF will be automatically published. Need to make changes? Edit your guide layer, and run the command again – it will automatically delete all the old layers, rebuild the timeline, and export a new SWF.

By default, the registration point (aka regX/Y in EaselJS) for every symbol will be set at the symbol origin. It is represented in the built out timeline with an empty symbol instance named “registrationPoint”. If you want to set up custom registration points for each symbol, you can do so by putting each symbol on it’s own frame in the guide layer, and adding a “registrationPoint” instance for each. These registration points will be preserved in the prepared timeline. Check out the included “advancedExample.fla” file to see this in practice.

Once your SWF is ready, just bring it into Zoë, configure the settings as appropriate, and push “Export”. Once you set up a SWF once, Zoë will remember the settings for it, so exporting a new sprite sheet from your FLA is as simple as running Prep for Zoë to update the SWF, then running export in Zoë. Hand the updated image(s) and JSON data to a dev, and it’s ready to be integrated into a game or other experience.

You can grab the JSFL command here, including a couple of example FLAs to get you started. To use the command, either double click the JSFL file (this will immediately run it on the front-most FLA if Flash is open), or copy it into the Commands folder in your Flash config directory – it will then be available in the Commands menu. You can download Zoë here.

New CreateJS Version Launched

I’m excited to announce the launch of new versions of the CreateJS libraries and tools. CreateJS is a suite of open source libraries and tools to make it easier to build really rich, interactive experiences using modern web standards.

This release added a ton of new features, including masks, multitouch support, run time generated sprite sheets, and better support for fluid or multi-resolution experiences. We also refined functionality, fixed a bunch of bugs, and added tutorials on a number of major topics for EaselJS.

The biggest change, which you’ll want to be aware of if you’re going to migrate existing content to the new versions is that all classes are now in a configurable namespace. You can either use the default “createjs” namespace, switch it to something more convenient, or configure it to not use any namespace at all to retain compatibility with legacy content.

I’m hoping to write up a more detailed overview of this release when time permits – things are very busy here at gskinner.com!

You can grab the latest, and get more info about CreateJS at createjs.com.

Disable Local Security In Chrome (More Easily)

This is a quick follow up to my previous post about disabling local security errors in Chrome on OSX.

I’ve been working a lot with command files lately and thought I would share a simple one that you can double-click in the Finder to launch Chrome with the -disable-web-security flag set. This lets you test content locally that uses “sandboxed” JS features like accessing the pixel data of local images. Handy when working with EaselJS.

This comes with the obvious warning that you probably shouldn’t surf the web in this mode.

You can download the command here. For it to work properly, you need to quit Chrome prior to running the command. You may also need to open it up in a text editor and change the path to Chrome if it’s somewhere other than /Applications, or you want to use this command with Chrome Canary.

Command files are pretty handy – they let you package Terminal commands into a file that can be double clicked in the Finder. Definitely worth learning about if you’re a developer on OSX. There are also .terminal and .term files, which provide similar functionality with a little more control, but they seem to have some issues in the current version of Terminal.

Media Keys In OSX For Any Keyboard

I recently bought a shiny new mechanical keyboard to use with my Mac. So far, I’m liking it, but I miss having media keys for controlling volume and music playback like on my Apple & Logitech keyboards.

To address this, I wrote a few simple Applescript services that you can bind keyboard shortcuts to, which enable media commands (volume up/down, mute, play/pause, and next/prev track) for any keyboard.

You can download them by clicking here. Once downloaded and unzipped, simply double click each workflow file to install it. Note that these are only tested in OSX 10.7 Lion.

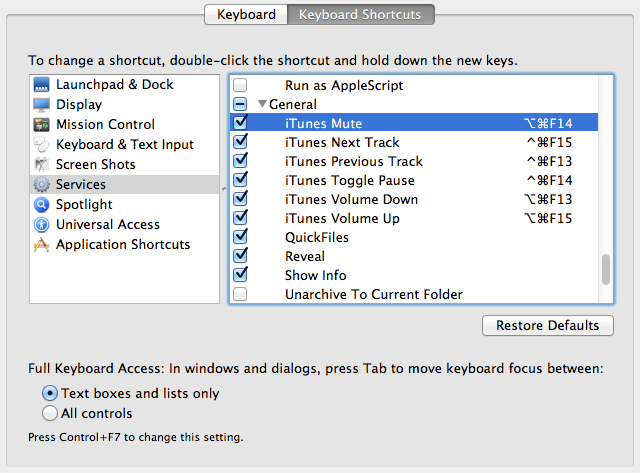
To bind keyboard shortcuts to the scripts, go to System Preferences > Keyboard > Keyboard Shortcuts. Select Services in the left panel, then scroll down to the script you want to assign a shortcut to. Double click on the right side of the row to edit the shortcut. Now, just hit the key combination you want to use, and make sure the checkbox to the left is checked (it likes to uncheck when you edit the key combo).

I used the following shortcuts:
Command +:
F13 – Volume Down
F14 – Mute
F15 – Volume Up

Command + Option +:
F13 – iTunes Volume Down
F14 – iTunes Mute
F15 – iTunes Volume Up

Command + Control +:
F13 – iTunes Previous Track
F14 – iTunes Toggle Pause
F15 – iTunes Next Track

I chose these because they are conveniently grouped at the top right of my keyboard, and I don’t use them for anything else. Note that you seem to need to include a Command in your key combo for it to work everywhere.

Also note that I made the system volume control fairly granular (5% increments), and the iTunes control fairly coarse (20% increments) based on my personal preference. You can easily edit these values by opening the workflow files in Automator. The scripts can be found at ~/Library/Services/ once installed.

Creating Great Developers: Conclusion.

Earlier posts in this series: “Introduction“, “Hiring“, “Orientation“, “Training“, “Planning“, “Production“, and “Shadowing“.

At the end of shadowing, the trainee has been with us for 10-12 weeks, has received intensive classroom-style training, has planned and developed a small project from start to finish, and has worked on real commercial projects in parallel with a few of our most senior developers. Throughout this, we have been assessing and providing feedback on their productivity, code quality, communication skills, time management, and problem solving ability.

At this point we know for certain (hopefully) if they are going to be a great addition to the team.

As the 3 month mark approaches, we schedule a meeting with all of the senior staff who worked with the trainees. We compare notes, and discuss the strengths, weaknesses, and growth of the trainee, citing specific examples wherever possible. I take a lot of notes, and bring them into the review.

I like to keep reviews informal, usually over lunch or a beer. I talk to the trainee about what they are doing well, and how they could improve. Again, I try to use concrete examples where possible, so they can relate the input to real experiences. I give them lots of opportunity to ask questions or provide their own feedback on their performance and the training they’ve received.

If things didn’t work out, I make a point to provide them with honest feedback on what I think they need to work on if they want to continue in the industry, and where they could go next. I ask them how they’d be most comfortable with me announcing their departure to the team, and we generally have beers as a group to see them off amicably.

If things went well, I welcome them to the team, ask them a bit about their goals for the future, and start talking through possible projects we could put them on. From this point on we work aggressively to keep them busy on real projects, under the watchful eye of more senior staff who can ensure the quality of their output, and help to continue their growth in the company.

Of course, this whole process requires a large up-front investment which is wasted if we can’t retain our staff. I try my best to make gskinner.com a great place to work. We keep regular office hours, encourage our team to have a life outside work, pay fairly, have a good bonus model, offer praise and appreciation for accomplishments, foster continuous learning, promote a fun work environment, try to book interesting projects, and protect our staff from abusive clients. I would much rather lose a bad client than a good developer.

I have an amazingly fun and talented team that I love working with, and one of the things I’m most proud in my professional life of has been keeping them together over the years.

This concludes the Creating Great Developers series. Hopefully it helps inspire other dev groups to mould a new generation of creative, competent developers, and treat them with the respect they deserve. Interactive development is a creative pursuit, and I’m a strong believer that you can’t get exceptional results by treating developers as a commodity.

Note: I’m planning to revisit this series to do some editing (I’m not completely happy with the quality of writing), flesh out some details based on feedback, and add a persistent index.

The Case of the Disappearing Number

On a current project we were experiencing an issue with a specific numeric ID not working correctly. After some exhaustive debugging, it was isolated it to a seemingly bizarre phenomenon that manifests in both AS3 and Javascript: a missing number.

Specifically, we found that the number 10100401822940525 appears to simply not exist in these programming environment. You can test this for yourself, simply trace or log the following statements:
10100401822940524
10100401822940525
10100401822940524+1
Number(“10100401822940525”)
(10100401822940525).toString()

All of the above statements will output “10100401822940524”, when obviously all but the first one should return “10100401822940525”.

Theres no obvious significance to that value. The binary/hex value isn’t flipping any high level bit, and there are no results for it on google or Wolfram Alpha. Additional testing showed the same result with other numbers in this range.

I thought it might be related to the value being larger than the max 32bit uint value, but adding a decimal (forcing it to use a floating point Number) does not help, it simply rounds it up to “10100401822940526” instead. Number should support much higher values (up to ~1.8e308). I confirmed this with:
Number.MAX_VALUE > 10100401822940526 // outputs true

As it turns out, the issue is a side effect of how Numbers are stored. Only 53bits out of the 64bits in a Number are used to store an accurate value. The remainder are used to represent the magnitude of the value. You can read about this here. So, the maximum accurate value we can store is:
Math.pow(2,53) =
9007199254740992 < 10100401822940525 This means that the precise value is not stored. Knowing this, we can rework our logic to store the value in two uints / Numbers. Thanks to everyone on Twitter that provided input to this article. I'd name contributors individually, but I had a lot of duplicate responses, and don't want to leave anyone out.

Update on EaselJS v0.3

EaselJS v0.3 is going to be a very significant update. It will include:

  • a much faster (currently 10-15x) and useful / robust interaction model
  • improved code clarity, documentation, and comments
  • early tool support (ie. the start of an API to allow tooling to export EaselJS content)
  • multi-line text
  • a (theoretically) faster and more flexible drawing engine, with support for skews
  • a public GitHub repo
  • a large number of new features & bug fixes
  • release of a sprite sheet creation tool

I originally expected to have this version released this week, but I’ve broadened the scope of what I’m changing. Given that, I anticipate the release will push out to next week some time, but I’d like to believe it will be worth the wait.

I’m still accepting feedback on bug fixes or minor features for v0.3, and am very open to ideas for v0.4 (which is likely to focus on performance and bounds support).

Creating Great Developers: Training.

If you haven’t already done so, you might want to check out the first three articles in this series: “Introduction“, “Hiring“, and “Orientation“.

Once we have a new hire brought up to speed on our tools and processes, we begin a week of intense, classroom-style training.

Currently, this training spans over four days (ie. Tuesday-Friday of their first week), and is taught by a mix of me and my most senior staff.

For the most part, we use slide decks (which you can find here) that I’ve presented in the past as a framework for the training, elaborating extensively and providing concrete examples throughout.

We try to leave the new hires some time in the afternoon of each day to explore some of the concepts taught. Each successive morning, we leave some time for a quick review of the previous day’s content, and to address any questions that have arisen.

On the first day of training, we run through “Things Every ActionScript Developer Should Know”, breaking out into “Resource Management” at the appropriate time. This introduces code standards, some philosophy, programmatic motion, object oriented programming, design patterns, resource management, and some related project management and UX concepts.

The second and third days are based around my “ActionScript 3 Workshop” slides, and focus on a technical overview of ActionScript, Flash and the AVM2 ecosystem. The third day ends with an overview of UI frameworks, including Flex.

While we work with a number of interactive technologies (such as Silverlight, HTML5, iOS, and Android), Flash remains our core business and is our reference technology. It’s easy to teach someone another technology if they have a strong grounding in one already.

Their last day of classroom training includes a run through optimization strategies and core user experience concepts using “Quick As a Flash” and “Creating Effective RIA Interfaces” as the outlines (the latter is old, but remains largely relevant).

Based on feedback from our first “grads”, we’ve been debating spreading out this rather intense four days of training over an additional week, and giving the trainees day-long projects to solidify their knowledge in between classroom sessions.

We end the new hires’ first week with a review of the next phase, solo project development, and encourage them to brainstorm over the weekend.

The next article in this series, “Planning”, can be found here.