With Adobe Flash Professional CC® you are able to publish HTML5 Canvas documents directly. Initially this was done using the Toolkit for CreateJS extension, however it has now been completely integrated into Flash, configurable from the Publish settings. Those who are familiar with publishing content with the Flash IDE will find themselves able to create HTML5-ready content using traditional Flash Pro timelines and tools. Even with little to no HTML/JavaScript experience, you can publish interesting and dynamic content within seconds.
The HTML5 output created by Flash Pro CC uses CreateJS, a suite of open-source JavaScript libraries, to create rich, interactive experiences for HTML5. Flash CC generates all the necessary HTML and JavaScript, as well as exporting necessary vectors, bitmaps, sounds, and animation. All content can run in any browser that supports HTML5 canvas (which is most of them these days).
This article’s purpose is to give you an understanding of what is exported from Flash CC, and demystify the output generated by Flash. We hope to follow up shortly with a part 2, showing how you can harness the generated HTML5 to build dynamic HTML/JavaScript content. For this article, I created a simple, bare-bones example that will guide you through publishing HTML5 Canvas content from Flash in four simple steps.
Key points
- Illustrating how to publish HTML5 Canvas project with Flash CC.
- Demystifying exported JavaScript from Flash CC.
In a few simple steps you can create an HTML5 animation from a mature animation and illustration tool
This article assumes that you have a basic knowledge of Adobe Flash CC. If not, please have a look at the links I have provided at the end of this article. It may also help to have some knowledge of the CreateJS libraries, which the exported HTML5 content relies on.
Getting started
Our first goal is to get a better understanding of what is being generated by Flash CC. I have to admit the first time I saw the “ToolKit for CreateJS” export Flash assets into HTML5 canvas from Flash Pro CS6, I was blown away. I couldn’t believe what I just witnessed: a complex vector animation which spanned hundreds of frames, exported in the blink of an eye. It looked exactly like a SWF. It was so cool – but what I was really amazed at was the sheer speed of this export tool. It didn’t take seconds, it took milliseconds!
I admit, I was very skeptical to see the generated code. I had only basic experience with JavaScript at the time and wasn’t sure I would be able to understand anything too complex.
Demystifying Exported Javascript
Here is an example of what I saw upon opening the exported code:
this.shape = new cjs.Shape();
this.shape.graphics.f("#000000").s().p("An1H1QjPjQgBklQABklDPjPQDRjREkABQElgBDRDRQDPDPABElQgBEljPDQQjRDRklAAQkkAAjRjRg");
this.shape.setTransform(260,218);
EaselJS export via FlashCC. (Compact Shapes)
Yikes! What does this mean?!? How does this black magic work? And most importantly, how can I use any of this?
Well I can sum most of these questions with… You don’t need to know everything that gets exported to take advantage of the exported code. What you see above is not even necessary to fully understand, but actually quite simple to read once you get the hang of the EaselJS drawing API. This just shows the creation of a Shape that gets a fill color with an empty stroke. The encoded string is series of drawing instructions for a complex path – which is intended to be compact, and not legible. In fact it uses the handy “Tiny API” methods that EaselJS supports to make it even more compact. So you get a pass for not remembering how to do it manually. If you really want to see what is going on, you can actually toggle the un-compacted instructions using the publish settings.
this.shape = new cjs.Shape();
this.shape.graphics.beginFill("#000000").beginStroke().moveTo(-50.2,50.2).curveTo(-71,29.4,-71,0).curveTo(-71,-29.4,-50.2,-50.2).curveTo(-29.4,-71,0,-71).curveTo(29.4,-71,50.2,-50.2).curveTo(71,-29.4,71,0).curveTo(71,29.4,50.2,50.2).curveTo(29.4,71,0,71).curveTo(-29.4,71,-50.2,50.2).closePath();
this.shape.setTransform(260,218);
EaselJS export via Flash CC. (Uncompacted Shapes)
Simple example
The following is a bare-bone example of how to publish an HTML5 Canvas document with Flash CC in 4 simple steps.
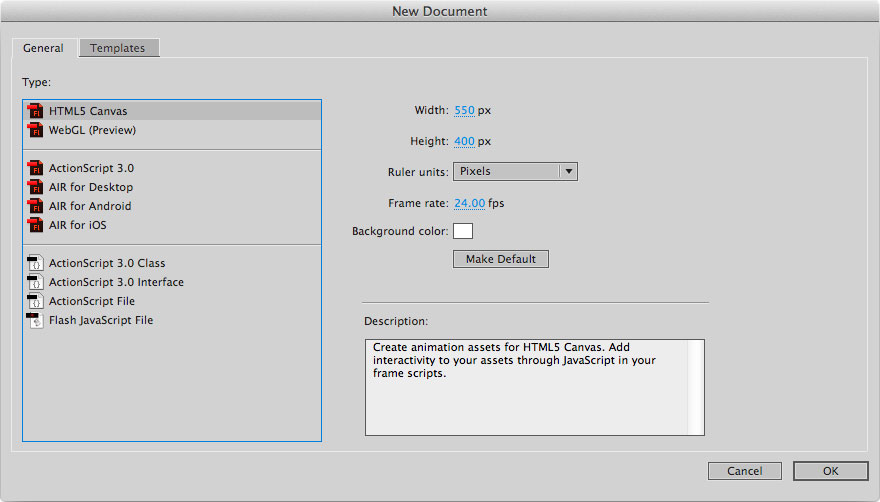
Step 1: Setting up your file
Create a new HTML5 Canvas with the default settings and save it. In this demo, I am using the name “BallTest.fla”.
Step 2: Create a simple MovieClip instance
Create a new MovieClip symbol called “MyBall”, and draw a simple circle. Right click on your selected graphic and select convert to a symbol.
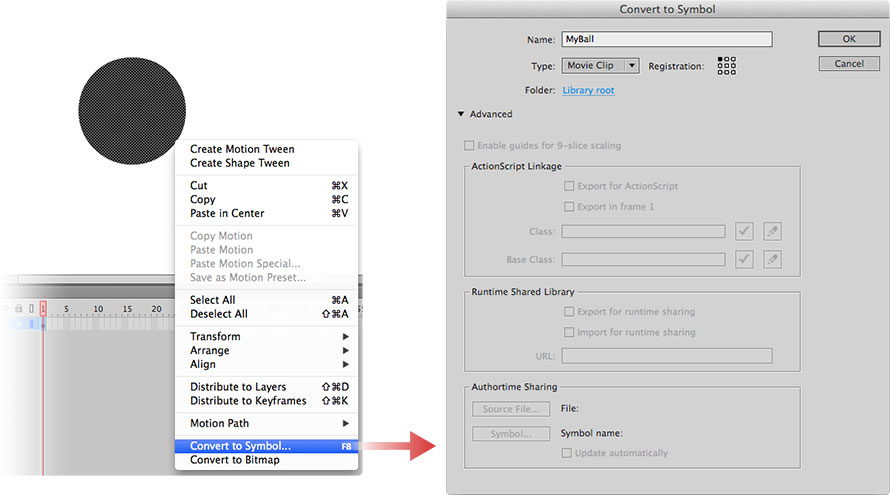

Unlike Flash, you don’t need to enter a “linkage”. All symbols in the library are exported.
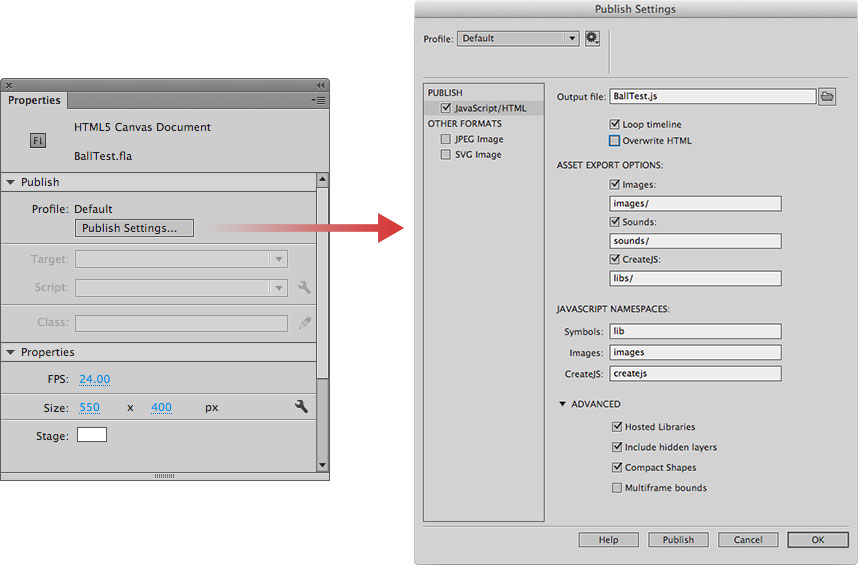
Step 3: Publish Settings
This step is optional, but recommended. Have a look at the “Publish Settings” (under the file menu) to ensure everything will export as intended. Most of this can be left with the default values, but it is good to know what control you have over the exported code.
- Output File is the path where your files will be generated. Defaults to the location of FLA.
- Loop timeline allows for the looping of timelines when checked. Checked by default.
- Publish HTML generates the HTML page each time files is published. This will overwrite any additions made to HTML file. Checked by default. It is a good idea to turn this off if you modify the HTML page source manually, otherwise it may be overwritten.
- Asset Export Options specifies the default locations for assets (images, sounds, CreateJS libs). When unchecked, these assets are not exported from the FLA.
- Javascript Namespaces define the global JavaScript objects in which symbols, images, and libs are referenced.
- Hosted libraries determines if the CreateJS libraries on the hosted CDN are used instead of local versions. If unchecked, each library will be added to project directory when publishing.
- Include Hidden Layers toggles if hidden layers will be included when publishing.
- Compact Shapes determines vector instruction are published in a compact form (see above), or more readable instructions.
- Multiframe bounds makes exported symbols have an array of visual bounds for each frame, or only a single bounds for each shape. Note: This will increase publish times.
Now we are ready to Publish!
Press the publish button (if you closed the dialog, you can use File » Publish or F12). Alternatively you can publish your project by using the cmd+Enter keyboard shortcut (or ctrl+Enter for Windows users), which all Flash developers should be familiar with.
Note: The directory your FLA is stored in is where your Canvas example will be exported to. You can change this location by clicking the browse button “ … “ in the publish settings. It is important to save your document, or this will be in a temporary directory that you might not be able to find easily.
Step 4: Inspecting the output
Now that we have successfully published our simple example, let’s have a look at what has been generated.
You’ll notice 2 important files created relative to your FLA.
- The HTML file
- A simple HTML file that imports all required CreateJS libraries relevant to your exported project (unneeded libraries such as PreloadJS for images, or SoundJS for audio are omitted if you don’t use those features).
- A
Stageinstance, which points to the HTML5 Canvas element in the DOM. - An instance of the root timeline is created and defined as the
exportRoot. - Finally, the Ticker class is used to set up an update loop, that will update your stage at the framerate defined in the FLA.
- The JavaScript file
- All the generated information from the FLA is included in a properties object, which defines your library settings (framerate, assets that need preloading, background color, etc).
- The rest of the code is comprised of instantiable JavaScript “classes” which are mapped to the FLA library assets. Because of this you are able to use the
newkeyword to create instances of the symbols within the library, and then add them to the display list on the stage. We will talk about this more in the Part 2 of the article series. - A class with the same name as your FLA (in this case “BallTest”) is available as well, which is a container object that holds all instances that have been placed on the root timeline of your FLA. This will become the
exportRootin the published HTML.
Where to go from here
That’s it! A bare-bones straight forward example on how to publishing HTML5 Canvas with Flash CC. In less than four steps you can create an HTML5 animation from a mature animation and illustration tool. Obviously this is not the most complex example, but should give you a decent idea of what is going on when publishing to Canvas.
For more information on Creating and publishing an HTML5 Canvas document visit Flash Professional Help.
For more information and documentation on the CreateJS libraries visit the CreateJS website.
Stay tuned for part 2, where I show you how to work with the exported code.
How does this handle timeline as3 code or attached script files? Can I use this to help port some of my older flash games to html5?
You can add Javascript to your timeline on a keyframe using the ActionScript panel.
Here a simple example calling an alert box when a movieClip is clicked.
http://grab.by/H11q
Although this is very simple example this should give you an idea of how Javascript can be inserted to your timeline. Please keep in mind that “Exporting to Canvas” does not port your existing AS3 code. You’ll have to do that conversion yourself, but that shouldn’t be too difficult once you understand the export process.
I am planning to release a part 2 of this article that will take a deeper look at the exported process from Flash to Canvas. Stay tuned.
If you have any other questions have a look at Stackoverflow http://stackoverflow.com/search?q=Createjs You’ll find tons of great people and answers to most questions.
If you are looking for more examples have a look at CreateJS.com or GitHub https://github.com/CreateJS
Thanks.
Can you point me to a source of information about how to re-super class FlashPro Library Symbols from the IDE in a HTML5 Canvas project. The equivalent to AS3 projects “symbol properties” > “export for actionscritpt” lets you define a symbols ‘Class’ name and custom parent ‘Base Class’ (which FlashPro checks it inherits from a Sprite.as class at some point)
Sub-classing (extending lib.symbol) there is a tonne of info, but re-super classing – especially from the FlashPro IDE – having multiple lib.symbols inherit from the same custom parent class (that extends a createjs Container class descendant) I have not been able to find ANYTHING on except this article:
‘Unlike Flash, you don’t need to enter a “linkage”. All symbols in the library are exported.’
and:
“Toolkit indeed exports library symbols with the AS-Linkage names specified.If no as-linkage names are present mc’s are exported with their names.” – hemanth kumar https://forums.adobe.com/thread/1203890?start=0&tstart=0
I can’t be the only person to want to re-parent class symbols with shared custom behavior, it was a pretty common AS3 practice, was it not?
Can you cover the FlashPro Library items ‘Linkage’ property and its intended HTML5 canvas use case in an up-coming article. All it seems to do is rename the FlashPro Library symbol name in the exported.js, NOT the library symbols parent class. Wandering what the benefit of doing this on export is? Rather than just changing the symbol name in the library if one did not like the one they gave it in the first place.
Which seems such a wasted opportunity for defining custom parent classes in the IDE rather than having wading through the export.js and doing it by hand!! Or have I been totally missed something really obvious for way too long? 🙂
I have even attempted to write a jsfl extension to do this based on the ‘Linkage’ properties with limited success because once you nest a few library folders their is an as yet unpredictable discrepancy between the createjs exported.js symbol order and the jsfl API’s library.items array order. Which I am still waiting to hear more from Grant on:
https://github.com/CreateJS/EaselJS/issues/597#issuecomment-91085284
Really looking forward to these articles, thanks Sebastian .
Nice article, looking forward to part 2…
What I’ve realize is that theirs no text input in HTML canvas and it’s a pain to remake some of the things I’ve made in flash… “Contact forms and other content that requires a input field”
Regarding input text. While possible, it would be very limited, and tough to make very useful. A better approach is to use DOMElement, and maintain forms in the HTML DOM. This isn’t supported by Flash export, but will give you a lot more control over your content.
How do I refer to frames or start/stop an animated MovieClip converted by Flash to a js script?
Hello. Could you please be so kind to tell me, how to use downscale for shape animation in Flash CC?
What is the name of the parent of objects placed on the stage in the timeline? What is their namespace?
What is the name of “this” when this piece of code (“this”) is placed on the timeline? It doesn’t seem to be “stage”…
I ask since I have trouble referencing objects placed on the timeline when I’m using listener events.
Thanks!
so many weird things happening:
1. in the same loop, a variable created in the last frame is being removed the next time it reaches it. when it declared like var cc = 0; but if I declare with this.cc = 0;
it works as it should, and always refer the variable as this.cc;
2. movieclips objects and sub-objects states are not removed when no longer on the timeline, so in the next loop when it reaches their keyframe on the timeline it still remembers their states.
Nice tut. Now I can access a flash pro movieclip in javascript, but how can you hide the movieclip using js? In as3 it was just _movieclip.visible = false;
thank you, Sebastian, for a very clear tutorial, I got the two files (html & js).
But I cannot make them run, when I double-click the Ball.html file a blank screen shows in my browser.
I’m a complete beginner in HTML/JS, though I’ve written a lot of games in Flash, which I’d like to convert.
Can you please give a step-by-step set of instructions for the first time you make a canvas app run? something like: Do I have to set up some plugIn in the browser? how do I do it? do I have to download stuff? what? where do I put it?
I just need help to get started, the rest, I’m sure I can handle…
Thank you
Mariana
Hi,
From the Display Advertising industry, I would point this:
– First: Never use non secure libraries, because Ads won´t be accepted by RTB, GDN and AdExchange Markets. So, you are using these calls:
You´d better do as follows:
– Second: Many AdServers do not accept Folder structure. So everytime a creative makes and Ad with Flash and converts it into html5, you are creating an “images” folder. This should be optional. All elements should be loaded at root level. For example Google Double Click does not accept folder structure
Hi,
Could somebody tell me how to put video to my canva document?
In flash it could be simply imported,
but in html5 mode this ability is disabled 🙁
Hello, put video in html file, tag video or iframe YouTube, get him Id, and in js of flash canvas getElementById.
Hi! Silly question, but how do I export this into a file I can send to someone? Ive created a canvas html and it has some basic interaction with buttons that go to another web page. How do I send this? How is the html and js usable? I don’t want to send friends a zip, is there an executable? And when this goes up onto a web page, what files do they need? Thanks in advance!!
Where is “part 2” that you mentioned “releasing soon”? It’s now 9 months since this article, and I’m not seeing a part 2. Although I’m not sure why you’d mention it if it was never going to happen.
Hi Matt, it’s in the queue. The article was written as a series, but work has a way of pushing stuff like this out. Thanks for your interest, we will try and prioritize it to get it out shortly!
Hi Lanny,
can’t wait for part 2 either! Would be great if you could incorporate a how to on offsetting the registration point of a movieclip on stage. Having trouble with this one, when animating using GSAP… Thanks!
Very nice. I’m looking forward to Adobe Animate CC
Part 2 please.
Hi,
Can anyone tell me here that how can I change color of movieclip dynamically in HTML5 canvas.