
While building the Wonderous app, we wanted to create an experience rich in visuals and animation, but that maintained smooth performance and didn’t drain users’ batteries.

We learned a lot about rendering optimization, and wanted to share our top 5 tips to help you make your Flutter app run better.
#1: Avoid extra opacity layers
A common cause of performance drains is using an AnimatedOpacity or Opacity widget where none is required. This creates an extra opacity layer for Flutter to render, which can be expensive.
Some common Flutter widgets already contain an opacity or color parameter which is usually cheaper than using an opacity widget. Some examples include Container, ColoredBox, Text and Image.
// use withOpacity to apply opacity to colors:
Container(color: myColor.withOpacity(opacity));
ColoredBox(color: myColor.withOpacity(opacity));
Text('Hi!', style: TextStyle(color: myColor.withOpacity(opacity)));

// images have an opacity parameter that accepts an Animation:
Image.network(url, opacity: myAnimation);

// set a fixed opacity on an image:
Image.network(url, opacity: AlwayStoppedAnimation(opacity));
In Wonderous, we used this approach to optimize fading images and text in a number of performance critical areas. We also created dedicated helper widgets, like a FadeColorTransition widget for fading blocks of color.
Keep in mind that if you apply opacity to individual children instead of fading the parent, you’ll also want to watch for visual changes due to compositing differences.

Note: In some cases, the Flutter engine can optimize out unnecessary opacity layers without you needing to restructure the layout. To determine if opacity blends are being optimized or not the MaterialApp.checkerboardRasterCacheImages setting can be useful:
void main() {
  runApp(MaterialApp(
     checkerboardRasterCacheImages: true,
     home: MyApp()
   ));
}
Note: Because the first example is blended as one single “flattened” layer, while the second is 3 individual layers. This can give a slightly different visual effect when things overlap. You will have to decide with your team whether this is an issue, and whether the trade-off is worth the performance gains.
#2: Don’t store oversized images in memory
A quick way to overload any device is to load images into memory (and by extension, the GPU) that are larger than they need to be.
Flutter’s built-in support for resolution-aware asset images can handle this in some cases, but when loading images from the network, you’ll want to add logic to ensure the image is the appropriate size in memory.
One way to do this is setting cacheWidth or cacheHeight on your image. This will cause the image to be decoded and stored in memory at a specific size. Similarly, CachedNetworkImage has memCacheWidth / memCacheHeight.
Image.network(url, cacheWidth: 1000)
Another option for addressing oversized images is to wrap your ImageProvider with ResizeImage. This will size the image down to the given dimension if it is larger before passing it through for display.
ResizeImage(image, width: 1000)
Of course, different devices have different screen sizes and pixel densities, which we should account for when sizing our images. To do this, we can grab screen information from MediaQuery, do a little math to calculate a reasonable size, and wrap it up in a nice method:
ImageProvider? capImageSize(BuildContext context, ImageProvider? image, {double scale = 1}) {
    if (image == null) return image;
    final MediaQueryData mq = MediaQuery.of(context);
    final Size screenSize = mq.size * mq.devicePixelRatio * scale;
    return ResizeImage(image, width: screenSize.width.round());
}

// Usage:
return capImageSize(context, Image.network(someImageUrl));
In Wonderous we took this one step further, creating an AppImage widget that we used for every network image in the app. Since we were loading a lot of large images from third parties (like the amazing Met Open Access API), this had a significant impact on performance overall.
// ex. for a full width image:
AppImage(image: NetworkImage(url), scale: 1.0)

// ex. an image in a two column list
// so it only needs to be about half the screen width:
AppImage(image: NetworkImage(url), scale: 0.5)
Note: To help spot images that are too big for their rendering space, you can use the debugInvertOversizedImages setting:
import 'package:flutter/rendering.dart';

void main() {
  debugInvertOversizedImages = true;
  runApp(MyApp());
}
#3: Use RepaintBoundary to reduce paints
RepaintBoundary lets you define sub-trees within your Flutter app that paint at different times than their siblings or ancestors. This can reduce paintChild calls, which can make things significantly more smooth.
While there is no perfect guidance for when to add a boundary, some examples of where you might use one are:
- an app drawer that slides overtop of the main app to open and close
- a blinking cursor indicator
- a spinning progress indicator
- a tab bar that animates as it changes state
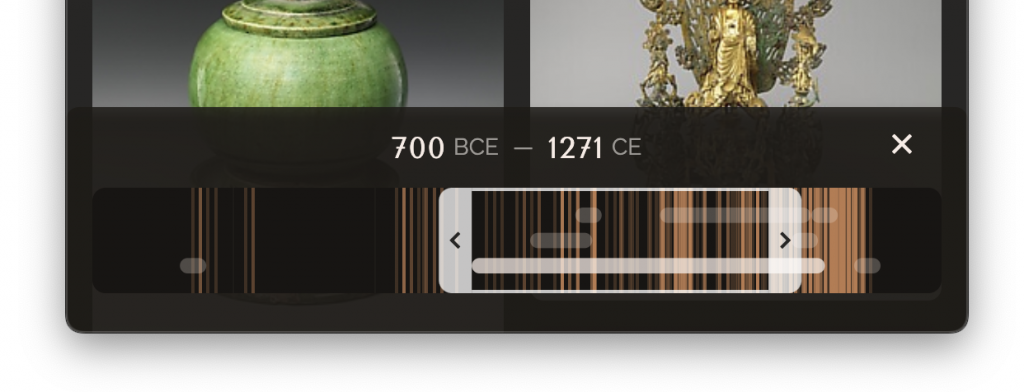
In Wonderous, the search timeframe visualization was getting redrawn whenever the content behind it scrolled, which was making the entire view feel slow. Adding a RepaintBoundary around it eliminated these extra paints and made the whole view feel snappier.
Repaint boundaries do have a cost though, so they should be used intentionally, and it’s valuable to test their impact as they are added. Scattering them in a UI arbitrarily can actually reduce performance.
Note: To help determine if your boundaries are helping or not, you can enable the debugRepaintRainbowEnabled setting which will visualize repaints as your app runs — watch for overly large repaint areas, or areas repainting that haven’t actually changed visually.
import 'package:flutter/rendering.dart';

void main() {
  debugRepaintRainbowEnabled = true;
  runApp(MyApp());
}
#4: Prefer ImageFilter.blur over BackdropFilter
BackdropFilter lets you blur arbitrary content layered behind the widget. This is great for situations such as blurring the background when displaying a dialog overlay.
However, it’s often abused (we’ve done it 😬) to blur widget(s) within your current scope:
// DON'T layer a BackdropFilter over your content!
Stack(children: [
   Image.asset(...),
   BackdropFilter(
      filter: ImageFilter.blur(sigmaX: 6, sigmaY: 6),
      child: Container(color:Colors.grey.withOpacity(0.6))
   ),
])
Instead, wrap your content in a ImageFiltered widget:
// DO use ImageFiltered
Container(
   color:Colors.grey.withOpacity(0.6),
   child: ImageFiltered(
      imageFilter: ImageFilter.blur(sigmaX: 6, sigmaY: 6),
      child: Image.asset(...),
   )
)
This will usually give you the same visual effect, but render noticeably faster.
Note: When possible, use the other tips in this post (like repaint boundaries) to minimize how often blurs need to re-render.
#5: Use a “lazy” IndexedStack
This tip isn’t directly about rendering, but we found that it had a significant effect on visual performance and jank, so we thought we’d toss it in as a bonus.
IndexedStack is great for building custom tab bar navigation where you would like each page to maintain state when not in view. However, it instantiates all its children when it first loads. With multiple tabs, this is likely to cause your transition animations to stutter badly.
Luckily, it’s easy to wrap IndexedStack in a bit of code, which defers loading children until they are selected. It looks something like this:
// create a list to track child activation status:
late List<bool> _activated = List<bool>.filled(
   widget.children.length, false);

Widget build(BuildContext context) {
    // mark this index as activated
    _activated[widget.index] = true;

    // only build activated children
    final children = List.generate(_activated.length, (i) =>
      _activated[i] ? widget.children[i] : const SizedBox()
    );

    return IndexedStack(children: children);
  }
Check out the LazyIndexedStack we built for Wonderous, or take a look at or check out one of the several plugins on pub.dev.
That’s it for now! Hopefully you found some of these tips helpful. If you have other tips or tricks please share them in the comments below.
If you’d like to see these tips implemented in a real app, check out the source code for Wonderous, or install the app from the iOS or Play store.
Sir i want Wanderous App Gallery ui code
This is a really cool article. I’m working on a flutter video game, and have been learning/playing around with different types of painting/rendering/scene building and performance is always on my mind.
When you made Wonderous, did you notice any performance improvements with animations or painting using Impeller? Are you going to push a web version when canvas kit supports it?
I’m really interested to see what gskinner will do with the native GLSL shader compilation. Thanks for making this post, and all the examples you’ve shared on github, I can’t wait to jump into the code and learn from Flutter pros.
This is really great!!!!!!!!!
Animations always go wrong for me, but I’m going to keep working or hire a nearshore software development company lol at this point I don’t know.
Thanks
Awsome Artical Learned alot
Still great article, Nice job!